16 KiB
DKIM how-to
This how-to is created by the Dutch Internet Standards Platform (the organization behind internet.nl) and is meant to provide practical information and guidance on implementing DKIM.
Table of contents
- What is DKIM?
- Why use DKIM?
- Tips, tricks and notices for implementation
- Implementing DKIM with OpenDKIM for Postfix with SpamAssassin
- Implementing DKIM on HALON
- Special thanks
Table of contents generated with markdown-toc
What is DKIM?
DKIM stands for DomainKeys Identified Mail and is described in RFC 6376 with updates in RFC 8301 and RFC 8463. It is meant to provide the owner of a domain with the means to claim that a message has actually been send by the domain's e-mail server and should therefore be considered legitimate. It works by signing every individual e-mail message with a specific key (private key), so that the receiving party can use a corresponding key (public key) published in the sending domain's DNS record to validate the e-mail authenticity and to check whether the e-mail has not been tampered with.
Why use DKIM?
A common used technique used by spammers is to trick the receiving party into believing an e-mail is legitimate by using a forged sender address. This is also known as e-mail spoofing. DKIM has been designed to protect against spoofing. If an incoming e-mail does not have a DKIM signature or when it's DKIM signature does not validate, the receiving e-mail server should consider the e-mail to be SPAM.
Tips, tricks and notices for implementation
- Use a DKIM key (RSA) of at least 1024 bits to minimize the successrate of offline attacks. Don't go beyond a key size of 2048 bits since this is not mandatory according to the RFC.
- Make sure to change your DKIM keys regularly. A rotation scheme of 6 months is recommended.
- If a domain is not using e-mail (anymore), it is recommended to set an empty public key: "v=DKIM1; p=".
- When used with a specific selector, an empty public key means that e-mail signed with the associated public key must be considered unreliable since they public key was revoked.
- When used with a wildcard selector, setting an empty public key indicates that all previously used keys are revoked and must be considered unreliable. The owner of a domain can also use this to explicitly signal that a domain is not configured to use e-mail.
- According to the RFC the absence of a selector / public key (e.g. as a result of deleting the entire DKIM resource record) is semantically equal to a resource record with an empty public key. This means that both approaches should be treated similar by the receiving mail server.
Canonicalization
As mentioned in RFC 6376 section 3.4 some mail systems modify e-mail in transit. This type of modification is called canonicalization and is generally used to make things comparable before presenting the email to the signing or verification algorithm. You can imagine that this is important when signing and validating an e-mail; if things change too much this can invalidate a DKIM signature, which also impacts DMARC.
DKIM software allows you to specify the canonicalization settings. The settings used by the sender are set in the DKIM header of every e-mail using the "c" tag. Accepted values are "relaxed" and "simple" and since canonicalization exists for both the header and the body of an e-mail, the format used to represent the canonicalization setting is "value/value" for header and body respectively.
We currently advise against the "simple/simple" canonicalization setting because this (being the most strict setting) tolerates almost no modification of the header and body before signing, which is prone to cause problems when forwarding mail. This is confirmed in RFC 7960 section 2.3 and section 4.1.1.2. Therefore we recommend to use the "relaxed/relaxed" setting which tolerates common modifications of the header and body before signing.
Notice:
- When not specified DKIM canoncalization defaults to "strict/strict".
- "c=strict" equals "c=strict/strict", but "c=relaxed" equals "relaxed/strict".
Implementing DKIM with OpenDKIM for Postfix with SpamAssassin
Specifics for this setup
- Linux Debian 9.8 (Stretch)
- SpamAssassin version 3.4.2 (running on Perl version 5.28.1)
- Postfix 3.4.5
- BIND 9.10.3-P4-Debian
- OpenDKIM v2.11.0
Assumptions
- DNSSEC is used
- Mail server is operational
- Software packages are already installed
Outbound e-mail traffic
DKIM for outbound e-mail traffic can be accomplished by publishing a DKIM policy as a TXT record in a domain name's DNS zone, and by configuring the e-mail server to sign outbound e-mails.
Set up OpenDKIM and created key pair for your domain
Make sure the file */etc/opendkim.conf has a least the following configuration options.
UMask                   002
Canonicalization        relaxed/relaxed
Mode                    sv
AutoRestart             Yes
AutoRestartRate         10/1h
ExternalIgnoreList      refile:/etc/opendkim/trusted_hosts
InternalHosts           refile:/etc/opendkim/trusted_hosts
KeyTable                refile:/etc/opendkim/key_table
SigningTable            refile:/etc/opendkim/signing_table
PidFile                 /var/run/opendkim/opendkim.pid
SignatureAlgorithm      rsa-sha256
UserID                  opendkim:opendkim
Socket                  inet:12301@localhost
Create the the file /etc/opendkim/trusted_hosts and make sure it contains the following:
127.0.0.1
localhost
example.nl
mail.example.nl
Now create the directory /etc/opendkim/keys/example.nl and execute the following command with this directory and make sure to replace 'YYYYMM' with the number of the current year and month. For example: "selector201906". This makes it easier to determine the age of a specific key in a later stage.
opendkim-genkey -s selectorYYYYMM -d example.nl
There are now 2 files in /etc/opendkim/keys/example.nl (the key pair):
- selector201906.txt: this file contains DNS complete DKIM DNS record including the public key.
selector201906._domainkey IN TXT "v=DKIM1; k=rsa; p=MIGfMA0GCSqGSIb3DQEBAQUAA4GNADCBiQKBgQCooJQftNOg3wOqVW5wOpr1PhhzgeP1IE9dTOtpUOCENP+z1HwP+8fFp9aGo/EKHoDQRhDUxXlVfocmRjb0lyjHD5ax16BBKLAd8+AgHZt1er8fmm2cL+7nurv0vU5YBG9LGUklD9qO/zJrIz+Lp+YO7D2rt0qYAgGzUOLJBWLBNQIDAQAB" ; ----- DKIM key selector201906 for example.nl
- selector201906.private: this file contains the private key which is going to be used by Postfix to sign all outbound e-mails.
-----BEGIN RSA PRIVATE KEY-----
MIICXAIBAAKBgQCooJQftNOg3wOqVW5wOpr1PhhzgeP1IE9dTOtpUOCENP+z1HwP
+8fFp9aGo/EKHoDQRhDUxXlVfocmRjb0lyjHD5ax16BBKLAd8+AgHZt1er8fmm2c
L+7nurv0vU5YBG9LGUklD9qO/zJrIz+Lp+YO7D2rt0qYAgGzUOLJBWLBNQIDAQAB
AoGASy+V+/Efbxogw0DmRgoLb4+pTU87+d7XJC2YxVN3V9tdq6vxSRslPr8QCuZs
Ievp2XN0K7qE2BbbYbhq5nHDjwzPJ7vCZzN3JI8eOC9gKP++Te6AAcDjP+G3LND4
Np2AWsn6JwGeM0QYI5Ehrxrw5HlqNb620N6wOEyd/7s4Px0CQQDVT3LhDzUOkbAW
J/jUHdV4WYozRcBGFFJvH85ASJAbK9OSrF3tfJZj9e78xP4Z5EZ8jp9iKgajt5zl
fYtAYjZfAkEAyl/gascX17nxO3rH/8hr8dPS6hY0KYTKXCZfuvYaSG7AZ3oaSQSc
mz3Rz67cm14DZNc01aBE7PwiRjq9TsQo6wJAQkppijXeqENwdMJBWzJWWAuDnoGL
ynugTraUs3eZiUgqfUeh/R8d4bzZY6aYzVUa7rSoJaqn25NBaDSG5SBggwJBAKrp
VepXwjcafjSxeP74ENHnBxVTMzJtR0mTzv1iosfRYQUDBffswSYKi4tOLlm4iD09
0w0nkY5jUb7mFMLUv4kCQDjgGWNO8AeAohYF47fmYXeMMvS29rKtdLiR7D41WtOo
+zM7YTQa9kGRihEK+iT8v1x7ZX3mt0WZ5eoupeGauio=
-----END RSA PRIVATE KEY-----
Now make sure that the private key can only be read by the user opendkim by executing the following command:
chown opendkim:opendkim selector201906.private
The next step is to create the key table file /etc/opendkim/key_table. This file will tell opendkim about the domains that have been configured and where to find their keys. Add the following to configure example.nl:
selector201906._domainkey.example.nl example.nl:selector201906:/etc/opendkim/keys/example.nl/selector201906.private
Create the file /etc/opendkim/signing_table and add the following line:
*@example.nl selector201906._domainkey.example.nl
Start OpenDKIM and check your logfiles for possible errors.
Key rotation
OpenDKIM does not support the automated rotation of DKIM keys. This means that you should rotate your keys manually, write a script to do this, or use an existing script like https://github.com/tetsuo13/OpenDKIM-Rotate-Keys or https://github.com/captbrando/dkimrotator.
Publish the DNS record
Make sure to add the following lines to you domain's zone file:
selector201906._domainkey IN TXT "v=DKIM1; k=rsa; p=MIGfMA0GCSqGSIb3DQEBAQUAA4GNADCBiQKBgQCooJQftNOg3wOqVW5wOpr1PhhzgeP1IE9dTOtpUOCENP+z1HwP+8fFp9aGo/EKHoDQRhDUxXlVfocmRjb0lyjHD5ax16BBKLAd8+AgHZt1er8fmm2cL+7nurv0vU5YBG9LGUklD9qO/zJrIz+Lp+YO7D2rt0qYAgGzUOLJBWLBNQIDAQAB"
_adsp._domainkey IN TXT "dkim=all"
The first line publishes the selector and the associated public key. The second line tells receiving mail server that all e-mail coming from the domain example.nl are DKIM signed.
Configure Postfix
The final step is to configure Postfix to actually sign outbound e-mail using OpenDKIM. In order to do this add the following to /etc/postfix/main.cf:
milter_protocol = 6
milter_default_action = accept
smtpd_milters = inet:localhost:12301
non_smtpd_milters = inet:localhost:12301
When you are ready to start using DKIM restart Postfix, but make sure you waited long enough for the DKIM DNS record to succesfully propagate.
Inbound e-mail
Configuring SpamAssassin
SpamAssassin uses a scoring mechanism in order to determine if an e-mail should be considered spam. By default SpamAssassin considers an e-mail to be spam if the score at least "5". An e-mail starts with a score of 0 and points are added based on the tests performed. The tests performed can be configured by adding specific configuration parameters in /etc/spamassassin/local.cf.
Now here's the tricky part. The points added to the score of an incoming e-mail based on the results of a specific test, is at its core a custom job. Many variables can be taken into consideration when scoring an e-mail (which is considered the strength of a post-SMTP spam filter) and the detailed scoring depends on a domain owner's specific wishes. For the sake of this how-to, the DKIM scoring will be based on the assumption that the domain owner wants to consider an e-mail to be spam if the sending e-mail server's DKIM signature is not valid.
With SpamAssassin this can be configured by adding the following scoring configuration parameters to /etc/spamassassin/local.cf:
score DKIM_ADSP_ALL 5.0
# No valid author signature, domain signs all mail

score DKIM_ADSP_DISCARD 5.0
# No valid author signature, domain signs all mail and suggests discarding the rest

score DKIM_ADSP_NXDOMAIN 5.0
# No valid author signature and from-domain does not exist
This means that incoming e-mail is instantly classificied as spam if there is not a valid DKIM signature in the mail header and:
- the sending domain's DKIM ADSP record states that all e-mail should be signed and all unsigned mails should be discarded (DISCARD).
- the sending domain's DKIM ADSP record states that all e-mail should be signed (ALL).
- the domain used in the "From"-header (a.k.a. RFC5322.From, Header From, Message From) does not exist.
Implementing DKIM on HALON
This example uses the internal capabilities of Halon for DKIM, it is possible to retrieve the private keys externally but that is outside this scope.
Specifics for this setup
- HALON 5.1-p3-argy
Assumptions
- Basic configuration of Halon
- Operating DNS Server
Generic configuration
Upload or generate private key
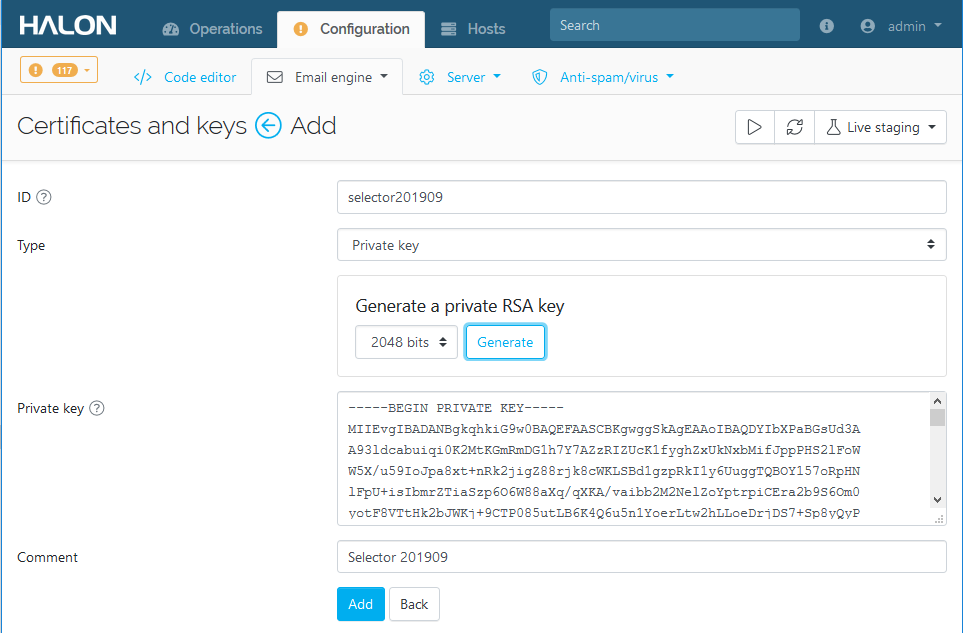
Navigate to: Configuration -> Email engine -> Certificates and keys -> Add
- Give a ID (name) for the private key. Only lowercase, numbers and letters (limitation of Halon).
- Select Type Private key and hit Generate.
- Add a Comment like the selector name and date.
- Click Add and then select the newly created private key in the overview, then click Details on top of the page.
On the detail page you see the public key you just generated and the button "DKIM record".
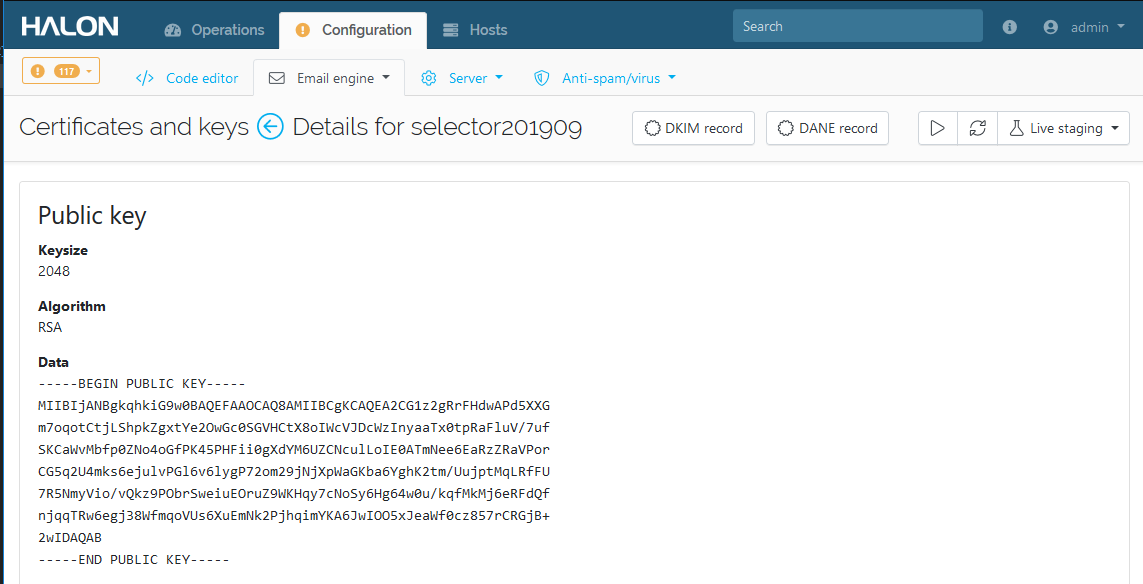
Click the "DKIM record" button and give your Domain and Selector which you want to use. Hit "Generate" and here you see the DKIM record which you can use in your DNS server.
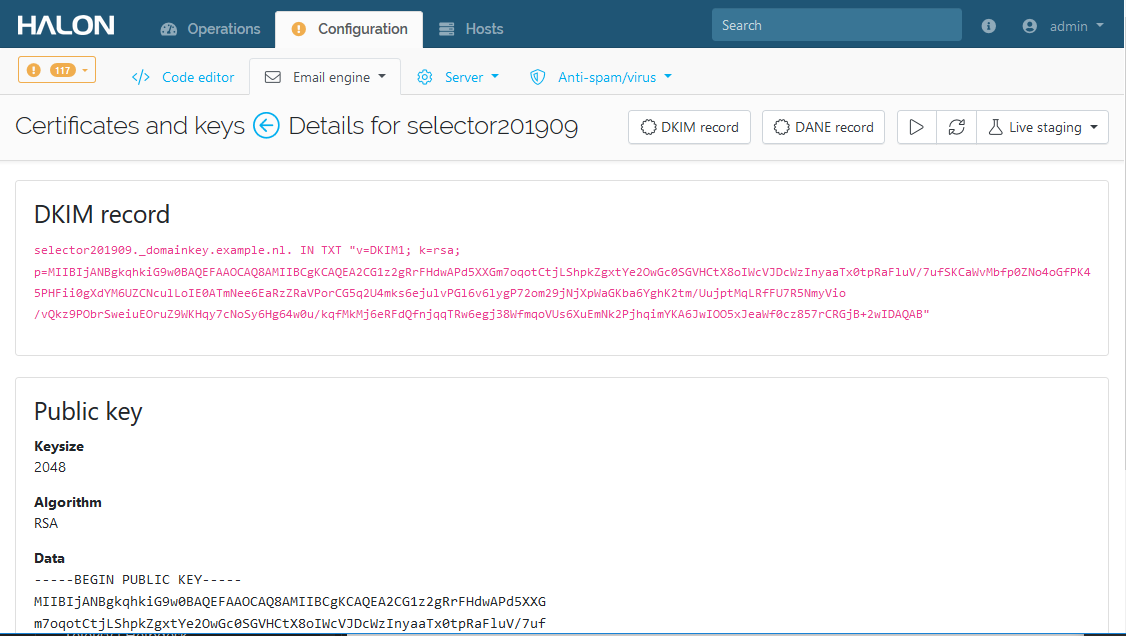
Publish the DNS record for the domain in your DNS environment.
Outbound signing
Navigate to Configuration -> Code editor select there the End of Data (EOD/EOD rcpt) script where you want to use the DKIM signing.
Before the GetMailMessage()->queue() add:
$dkimselector = "selector201909"; // Selector
$dkimdomain = "example.nl"; // Header From:
$dkimcertificate = "selector201909"; // certificate ID
if (GetMailMessage()->signDKIM($dkimselector,$dkimdomain,"pki:".$dkimcertificate) == none)
    Defer("DKIM signing error, bla bla error message");
The following syslog message is visible in the logging if DKIM signing is successful.
[6xxxxxxb-dxxf-1xx9-bxx5-0xxxxxxxxx4] [EOD] DKIM signed for example.nl (selector201909) with signature b=Yxxxxx9
Inbound email
Navigate to Configuration -> Code editor select there the End of Data (EOD/EOD rcpt) script where the incoming mail is checked.
Before the GetMailMessage()->queue() add:
foreach (GetMailMessage()->getHeaders("DKIM-Signature", ["field" => true]) as $i => $dkimsign) {
    $dkimresult = GetMailMessage()->verifyDKIM($dkimsign);
    if ($dkimresult["result"] not "pass") {
        // Do something like Defer() Reject() or higher spamscore;
    }
}
The following syslog message is visible in the logging
on success:
[2xxxxxxc-dxx2-1xx9-axxv-xxxxxxxxxxxa] [EOD] Processing (dkimverify)
[2xxxxxxc-dxx2-1xx9-axxv-xxxxxxxxxxxa] [EOD] DKIM(example.nl): Successfully verified

on error, selector not found in DNS:
[2xxxxxxc-dxx2-1xx9-axxv-xxxxxxxxxxxa] [EOD] Processing (dkimverify)
[2xxxxxxc-dxx2-1xx9-axxv-xxxxxxxxxxxa] [EOD] DKIM(example.nl): Permanent error: No key for signature selector201909._domainkey.example.nl

on error, Mailbody has been manipulated:
[2xxxxxxc-dxx2-1xx9-axxv-xxxxxxxxxxxa] [EOD] Processing (dkimverify)
[2xxxxxxc-dxx2-1xx9-axxv-xxxxxxxxxxxa] [EOD] DKIM(example.nl): Permanent error: Body hash did not verify
Special thanks
Our infinite gratitude goes out to the following people for their support in building this how-to for DKIM.
Tom van Leeuwen